Showing posts with label injury prevention. Show all posts

Tuesday, 20 January 2015

Glute Activation: Reduce risk of injury and increase performance

Hello again. This article follows on from previous articles on foam rolling and mobility, flexibility and stability. These three areas have been discussed as part of a pre-training routine, in order to reduce risk of injury and enhance performance.

This article will look at what glute activation is, how it can be achieved and why should it be considered as part of your pre training routine.

What is glute activation?
Your glutes are a powerful muscle group, made up of the gluteus maximus, gluteus minimus and gluteus medius.  These muscles play an integral role in your performance, as they are heavily involved in powerful movement such as sprinting, jumping or change of direction.

If these muscles are weak or inactivate (gluteal amnesia), other muscles are forced to compensate, leading to an increased risk of injury and decrement in performance levels. Therefore it is important to strengthen these muscles and ensure they are ‘active’ ahead of exercise.

How can this be achieved?
There are a number of stretches and exercises we can do in order to activate our glutes.

Pre-activating muscles with near maximal exercises / lifts have previously proved effective, through enhancing neural drive. A disadvantage of this is that muscles are exposed to a risk of fatigue and you must have access to gym equipment.

By activating muscles using body weight exercises, your routine can be done anywhere and anytime, with no equipment required.  For example this can be done on the pitch before a game, as a part of your pre match warm up. Mini bands can be used to add an external resistance to the body. These bands are not too hard to find and won’t break the bank either.

Here are a few examples. Try to ensure all exercises are performed in a controlled manner.


Glute Bridges (double / single leg)


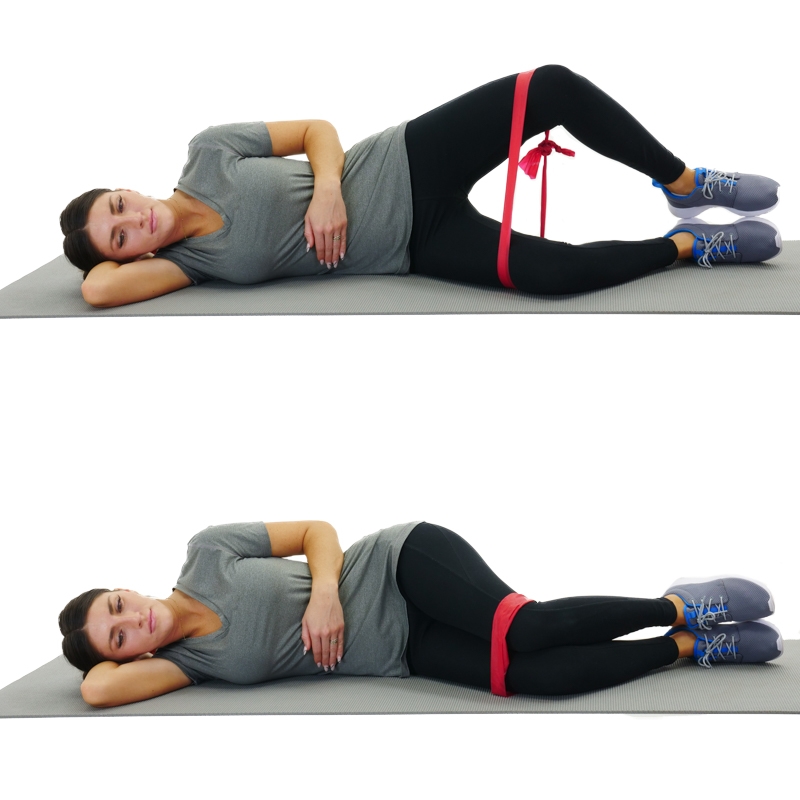
Clams


Hip Abductions


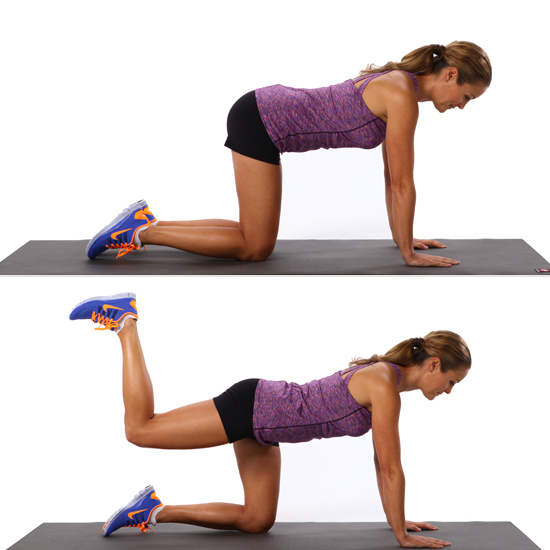
‘Fire Hydrant’


‘Donkey Kick’


Side Steps


Monster Walk


What does the research say?

A study by Crow et al. (2012), examined the effect a low load warm up, to activate the gluteal muscles, had on performance with a group of Australian rugby players.

Seven exercises were used in the warm up to target the gluteus, including some of the exercises listed above; glute bridges, clams and hip abductions.

Results of the study showed that this warm up significantly increased lower body peak power and improved jump height scores in a weighted (20kg bar) squat jump test.

These results highlight that a warm up incorporating gluteal activation exercises has the ability to increase performance levels significantly.

So why not give it a go your self?

If you would like any tips on the exercises listed above or any other details regarding glute activation, as always, I am more than willing to help.

Thank you again for taking the time to read this article! Goodbye for now.

Reference

Crow, J., Buttifant, D., Kearny, S. and Hrysomallis, C. (2012). Low Load Exercises Targeting the Gluteal Muscle Group Acutely Enhance Explosive Power Output in Elite Athletes. Journal of Strength and Conditioning Research, 26(2), pp.438-442.

Friday, 19 December 2014

Foam Rolling - How to do it, why you should do it and who says it's worth it


This article is all about the world of self-myofascial release (SMR), in particular, foam rolling.  If you have never heard of this term or would just like to know a bit more information about it, you have come to the right place! This article will be discussing what a foam roller actually is, why they are used, what they actually do and, finally, what does the latest research say about them?

I hope you enjoy!


What is a foam roller?


So first up, what is a foam roller? Its not a trick question, a foam roller is simply just a cylinder piece of foam (that rolls).  They come in various sizes and densities, which is usually indicated by the colour of foam. White rollers are the softest, black rollers are the firmest and blue rollers are somewhere in between. They are not hard to find either, just search online for a foam roller and you are sure to find a stockiest.


For anybody that has never seen a foam roller and is wondering what I am talking about, this is what one looks like...

 
As you can see, they aren’t flash and they aren’t fancy. 


You might be wondering why this piece of foam is so special?  


Why should I use one?

Most athletes will use a foam roller with the aim to reduce muscle soreness and enhance their recovery in order to maximize their levels of performance.  But how is this achieved?


What do they do?

In simple terms, just think of foam rolling as ironing (stay with me).

When you train hard, muscles suffer from micro trauma. This micro trauma can lead to the formation of scar tissue and knots in the muscle, which may impede nerve conduction and blood flow. This can then lead to muscle soreness and reduce the contraction speed of your muscles, therefore your performance!

By carefully aligning the roller with particular muscles (like an iron), the roller is used to apply pressure to areas of soreness in muscles. This enables you to break up the scar tissue that may have formed (like creases in a shirt).


They can also be used to increase your flexibility and your range of movement, a process called autogenic inhibition. As pressure is applied to the muscle, mechanoreceptors called Golgi Tendon Organs inform the brain that tension is being placed on the muscle. The brain then sends a message back to relax the muscle, preventing it from tearing.  A reduction in tension means a reduction in pain and improvements in muscular function.


How do I use one?

As briefly mentioned, rollers are used to apply pressure on areas of soreness in your muscles. They are really simple to use. Place the roller on a sore muscle area and roll slowly, using your body weight to apply the pressure. Once you have found a sore point, stop and apply direct pressure whilst trying to relax the muscle. It is advised to spend between 30-60 seconds per muscle group, depending on your perceived soreness.


Foam rolling is a great method to use as part of a pre-hab routine before your training session or as part of a recovery routine after your session. It becomes a great habit to have in making sure that you are getting the most out of your training sessions.


But does it actually work?


What does the research say?
 
There are many studies that have researched the effectiveness of foam rolling but I have summarised the findings of two recent papers. The references can be found below in case you would like to look into them further.


The first paper looked at was by MacDonald et al. (2014). This study looked at foam rolling as a recovery tool after an intense bout of physical activity. Results concluded that foam rolling was a beneficial tool in reducing muscle soreness whilst also improving vertical jump height, muscle activation and passive and dynamic range of motion in comparison to a group that did not use foam rollers.

A study by Pearcey et al. (2014) found results that adhered to the findings by Macdonald et al. (2014). They concluded that foam-rolling effectively reduced the delayed onset of muscle soreness (DOMS) and the associated decrements in dynamic performance (sprint speed, power and dynamic strength endurance).

So that’s a little bit about self-myofascial release; why not get your hands on a foam roller and try it for yourself. I’d love to hear what you think!


References

Macdonald, G., Button, D., Drinkwater, E. and Behm, D. (2014). Foam Rolling as a Recovery Tool After an Intense Bout of Physical Activity. Medicine and Science in Sports and Exercise, 46 (1), pp.131-142.

Pearcey, G., Bradbury-Squires, D., Kawamoto, J., Drinkwater, E., Behm, D. and Button, D. (2014). Foam Rolling for Delayed-Onset Muscle Soreness and Recovery of Dynamic Performance Measures. Journal of Athletic Training. [In Press]


This article was written by Rob Etherington.

Monday, 24 November 2014

Why Do We Get Injured? And Can It Be Prevented?

My Story

I’m lying on my side with an oxygen mask over my mouth. The anaesthetist is sitting next to me. It seems to take an age for me to understand what he is saying; “Can you feel that? Does it hurt?” In my head, I slowly register his words through the fog of sedation. It does hurt; it hurts a lot. And it would hurt – after using a hammer to insert a metal tube into my spine, my surgeon is now using a saw to cut out bits of my disc. I’m kept awake so that I can move my leg if required, which is an important step to make sure I’m not suffering any permanent nerve damage. Although sedated, I can feel pain. Fortunately, my anaesthetist can turn up the sedation and put me to sleep, putting a temporary end to it all. After three hours of surgery (which was supposed to only last 45 minutes), I am wheeled into the recovery room to wake up fully. This is where the most painful experience of the whole operation occurs. All the deep tissue that lies around the spine, which has been in spasm for three months to protect the area of instability, suddenly realises it can relax a bit. All the toxins and waste products that have been building up in the tissue are released, and an intense feeling of pain hits me in my lower abdomen, which lasts for about 15 minutes, until the pain killers administered by the nurse kick in.
Damaged Disc
Figure 1: Disc that was removed during surgery.

So, how did I get to this point? I suffered my first real back injury when I was 18. Although I didn’t have an MRI scan on that occasion, judging by the symptoms I experienced, I was probably suffering from a disc issue. Then, when I was 20, it came back again. My back would seize up from time to time, making any activity difficult for a few days. It had a nasty habit of doing so in warm-ups for races, which made running difficult. This time, I did have an MRI scan, which showed dehydrated discs and a few protrusions in my lumbar spine. A plan was devised to work our way round this problem, and I managed well, suffering no real back symptoms after that year for the following three competitive seasons.
Then, in 2011, I was in the gym doing deadlifts. I’d love to say I was lifting a heavy weight, but the truth is I wasn’t – it was only about 60% of my rep maximum. About halfway through the set, I lifted the weight from the floor, and as I did, I remembered thinking that my back position wasn’t quite right. As soon as I thought this, I felt a weird shift in my back, like something moving backwards, followed by a shot of pain at that specific site, which then transformed into a very global, very severe pain. Every single muscle, from my knees to my neck, had spasmed. The spasm on my right side was so great that it pulled my pelvis towards that side, which made walking pretty hard. An MRI scan showed a pretty severe disc bulge in one of my troublesome lumbar discs. I rehabilitated for the next 12 weeks, got back into some decent running, and managed to run 10.19 that season.
Off the back of this 2011 season, I was all ready to go to the 2012 Olympics, which were taking place in my home country. I had been looking forward to this for ages, had moved to a place and a training group I thought could enable me to do this, and had just had a reasonably successful season despite missing a lot of training due to my back. I can’t remember the exact day I started to feel pain in my right hip, but it was around the start of November. I had another MRI, which showed that one of my discs had further degenerated, and would probably require surgery in about five years. As November turned into December, my symptoms were slowly getting worse; I’d wake up in the night and not be able to feel my right foot. I wouldn’t be able to lift my right leg high enough when running—all classic signs of reasonably severe disc dysfunction. But, because I wanted more than anything to qualify for the Olympics, I pushed it to the back of my mind. Another MRI in December showed that I would probably need surgery after the Olympics; that was fine by me as long as I could get there. At the end of December, I had an epidural and some injections in my back to settle down the symptoms and traveled to South Africa for a warm weather training camp. On the fifth day there, I woke up one morning, unable to move. There was no acute incident; I only went to sleep one night, and I woke up a wreck. I knew then that this was very, very bad. I didn’t train for the rest of the camp; I flew home and saw the surgeon, who recommended surgery. My MRI now showed a herniated disc severely impinging on my sciatic nerve. My surgery was set up for two months later. Living through those two months was tough; because my sciatic nerve was affected to such a degree, I was comfortable only in two positions, exactly straight (standing or lying) and exactly on my left side. Every other position caused excruciating pain and pressure in my leg. If I wanted to sneeze (when I had a cold), I used to have to stand in a doorway, brace my body and head against the door frame, and sneeze there to prevent my head from jerking forward, which was agony.
Fortunately, my surgery went well, and I ended up with about 50% of my L3-4 disc getting removed. I slowly rehabilitated myself, switched to bobsleigh, and got selected for the Winter Olympics. Sadly, once I was there, my back injury flared up again, and I was forced to withdraw and retire.

Why do we get injured?

If you are reading this and have taken part in sports at any level, you will have suffered a sporting injury. My back injury was on the severe end of the spectrum, but injury is something we all have to deal with. There are two types of injury: chronic and acute. An acute injury is a sudden onset, and the inciting event is identified by the application of some external force (Meeuwisse 1994). A chronic injury is an overuse injury, where repetitive micro trauma eventually causes an injury. But why do we get injured? Bahr and Krosshaug (2005) developed the “Comprehensive model for injury causation,” and, as the title suggests, it is very comprehensive! For an injury to happen, they state that there is an inciting event on a susceptible athlete. The more susceptible the athlete, or the more severe the inciting event, the greater the chance of injury.
Internal Risk Factors
Bahr and Krosshaug identified the following internal risk factors that make an athlete predisposed to injury:
  1. Age (maturation, aging)
  2. Gender
  3. Body composition (weight, fat mass, anthropometrics, bone mineral density)
  4. Health (history of previous injury, joint instability)
  5. Physical Fitness (strength, power, resistance to fatigue, joint ROM)
  6. Anatomy
  7. Skill Level (technique, postural stability)
  8. Psychological factors (competitiveness, motivation, perception of risk).
How well athletes score in these regions depends on how susceptible they are to injury. Take gender, for example. Being a woman significantly increases your chances of suffering anterior cruciate ligament injury (Arendt and Dick, 1995), potentially due to increased femoral tilt.
Interestingly, recent research has shown that our genetics can increase our predisposition to certain injuries. For example, a specific variant of the COL5A1 gene is associated with chronic Achilles tendinopathy (September et al., 2009).
Take my back injury as an example. I was at a massive risk of injury at that point of my career. I was genetically predispositioned to suffer from a back injury due to a syndrome I have, which means I have enlarged transverse processes, reducing my flexion and extension range, which, in turn, puts more pressure on my discs. (I’ve also recently had a DNA test done, in which I scored off the chart for injury risk!) I had a lot of previous injury in this area, which is an additional risk factor. My previous injuries had probably affected my movement patterning, which meant I wasn’t strong enough in certain movements, placing my already at-risk back in further likelihood of injury.

Exposure to extrinsic factors

Once an athlete with a high injury predisposition is exposed to external risk factors, the chance for injury is further increased. The external risk factors include sports factors, such as rules, protective equipment, and the environment. Within track and field, examples include a high training volume on a hard running surface potentially increasing the risk of shin injuries in athletes, or training outside in cold temperatures potentially increasing the chance of a musculoskeletal injury.
Using bobsleigh as an example, the environment in which the sport takes part is usually cold (I recall competing in -27 degrees Celsius), which increases the chance of musculoskeletal injury. There is also the possibility of injury from crashing, either an impact injury against the bobsleigh or track, or an ice burn from being held against the ice whilst being upside-down, travelling at 80 miles per hour. To reduce the risk of injury, we wear helmets and burns vests and strengthen our exposed areas to be able to handle the impact better.

Inciting Event

When we have a susceptible athlete who then comes into contact with an inciting event, then we have an injury risk. An inciting event could be a game-based situation, such as contact with another player or object, or falling over. It could be down to a biomechanical issue, such as a player changing direction and injuring his or her knee. In the case of a chronic injury, the inciting event could occur over a long period, eventually causing injury.
The inciting event for the injury that caused me to retire was pulling the brakes in the back of a bobsleigh. Pulling the brakes is a loaded spinal extension exercise, going from a position of sustained maximal spinal flexion to extension whilst pulling a load. I was already a severely at-risk athlete, taking part in an activity that exposed to me significant external risk factors (early morning activity, cold weather, technical requirements of maintaining extreme spinal flexion), which meant the chance of an inciting event was high. Had it not happened at that particular time, on that particular day, I strongly believe it would have happened at some point close to that, due to the fact that both the intrinsic and extrinsic risk factors were so great.

Can we predict an injury?

Once we know why we get injured, it would be useful to know if we can predict the chances of us getting injured. There is some evidence that we can. Obviously, every single athlete is predisposed to injury in some way through the mix of intrinsic and extrinsic factors, but there are ways we can predict who is more likely to be injured. The first is through a screening process. Gray Cook developed the Functional Movement Screen (FMS), which assesses athlete’s competencies at a variety of movements. Athletes that score poorly on the test are thought to be at more risk of injury. The jury is still out on the usefulness of screens such as the FMS. Kiesel et al. (2007) used the FMS in pre-season training with a football team and found that those that scored poorly were more likely to report an injury over the playing season. Freckleton et al. (2014) tested single leg hip bridging in a group of Australian Rules Football players in their preseason. The players that showed one leg to be significantly weaker than the other were much more likely to injure the hamstring in the weaker leg over the course of the season. Although it is still early days, genetic testing might be useful to give a picture of injury risk. Collins and Raleigh (2009) found that there is a wide variety of genes potentially associated with musculoskeletal injury. The ability to test genetics and use movement screens is potentially a really useful way to create effective training programmes to lower the injury risk.
Periods of high intensity or high volume of training are also a potential point of injury. Hullin et al. (2014) found that large increases in workload in a group of elite cricket fast bowlers were a reliable indicator of increased injury risk.
Poor nutritional status is also a risk factor for injury. Athletes that are in energy deficit are more likely to be in a fatigued state (as their recovery is potentially compromised) and so are at an increased injury risk. Various micronutrients also play a role in injury, including calcium and magnesium in bone health. Low levels of vitamin D have been linked to a decrease in bone mineral density as well the loss of muscle strength (Cannell et al., 2009). Athletes are generally vitamin D deficient, and so this is an easily modifiable risk factor.

How do we reduce our chances of getting injured?

Boxing Protective Gear

Figure 2: Boxers wearing gloves and protective headgear. WCAP boxers medal at U.S. National Championships – FMWRCby US Army

Is there anything we can do to prevent ourselves or our athletes from getting injured? In a recent meta-analysis on the effectiveness of injury prevention techniques, Lauersen et al. (2014) found that strength training is highly significant in reducing injuries. The mechanism for this is that the musculoskeletal system adapts to strength training, allowing the athlete to handle high loads more easily. Proprioceptive and co-ordination training were also shown to be helpful in reducing the injury risk. However, passive stretching pre-training or pre-competition does not show any protective effect. In my opinion, if a muscle is tight enough to restrict the range of motion at a joint, then this places you at an increased injury risk, and steps should be taken to address this. Chronic tightness in a muscle increases the chance of injury in that muscle through a variety of factors, and also potentially increases the global injury risk as it could cause other muscles to have to overwork.

Tips to Reduce Injury Risk

  • Consider a regular physical screening to assess current movement competencies, and pick up on any imbalances or strength deficits that may contribute to injury.
  • Ensure appropriate strength training is in place with adequate and sensible progressions for your age and maturation.
  • Make sure that your body composition is at the correct level for your sport. Being too heavy can increase the stress and force going through your joints, muscles, and ligaments. Some adipose tissue may be useful in contact sports to protect against impact.
  • Consider the sport specific demands of what you do, and ensure that your body can meet these demands. As a case in point, when I converted to bobsleigh, I had to ensure I could hold and maintain a large amount of spinal flexion in the back of the bobsleigh. To begin with, I couldn’t, but I designed a pre-habilitation programme to enable me to do this. Soccer players require greater conditioning of the ankles in order to handle cutting movements and also reduce the risk of ankle sprains in a tackle. An additional bobsleigh example of my own was the need to increase my neck strength so that if we ever crashed, I could use my head to lift my body off the ice, preventing ice burns. With regard to sprinting, the hamstrings have to be able to handle a large eccentric load throughout the sprint cycle, so they should be adequately conditioned to manage this task.
  • Try to avoid large, sudden increases in training volume or intensity. If these can’t be avoided, then ensure that appropriate recovery techniques are used.
  • Strive to meet the energy demands of your sport. Training and competing in a fatigued state increases the injury risk, so make sure you are conditioned enough to meet the demands.
  • Ensure that you have an adequate range of motion in the correct joints and that all areas are working well. If one joint has a less-than-adequate range of motion, it increases the chance of injury in that area and the pressure on the surrounding joints.
  • Fully recover from any previous injury. Keep rehabilitation going until there is no strength deficit in the muscle and normal motor patterning has returned.
  • Make sure your nutritional status is good; you should get sufficient vitamins and minerals to ensure that your bones and immune system are healthy.
  • Work on your posture and ability to hold this posture under fatigue. Being in the correct position at the correct time ensures optimal technique, which reduces injury risk. Being able to contract the right muscles at the right time is crucial to reduce injury risk. Let me illustrate this point: I currently suffer from right knee pain because my right gluteus medius has atrophied (due to nerve damage), so, under load, I can’t control my thigh as well as I used to in the past.
  • Make sure you aid your recovery from training. Sufficient sleep is important!
  • Improve your technique as much as possible. Poor technique is a risk factor for injury as it is usually less economical and can overload certain muscle groups.
This post was expertly written by former Team GB Olympic Sprinter, Craig Pickering.

Sunday, 16 November 2014

How to Grow a Pair

The title says it all. Here’s how you grow a pair of biceps, hamstrings, shoulders, and quads, as well as a good hefty pair of mental muscles, too.

Grow a Pair of Biceps

Simple guidelines:
  • Elbow flexion exercises (barbell, dumbbell, machine curl) done with extreme effort
  • The best - seated incline dumbbell curl with the forearm supinated (palms turned up)
  • The best - standing pronated grip bicep curl (palms turned down)
  • Work each set to volitional muscle fatigue
  • Perform a reasonable number of sets (one to three)
  • Repetitions can vary from 6 to 20

Grow a Pair of Hamstrings

hamstrings, quads, biceps, shoulders, hypertrophy, how to exerciseThere are three hamstring muscles - the biceps femoris, semitendinosus, and semimembranosus. They flex the knee (heel to butt) and extend the hip (pushing the thigh back).

Simple guidelines:
  • Perform lying, seated, and standing leg curls along with hip-extending stiff-leg deadlifts, Romanian deadlifts, and glute/ham raises
  • Work each set to volitional muscle fatigue
  • Perform a reasonable number of sets (one to three)
  • Repetitions can vary from 10 to 25

Grow a Pair of Shoulders

First, I am uncomfortable when the shoulder joint is discussed. Many believe the shoulder is only the visible top of that body part. This would be the medial deltoid. However, in reality we know the shoulder joint as a whole is comprised of a number of muscles that move the upper arm and scapula (shoulder blade) in various directions. Therefore, multiple-angle pushing and pulling exercises work the shoulder joint, strengthen it, and enhance its stability.

Here is a list of shoulder fortifying exercises:
  • hamstrings, quads, biceps, shoulders, hypertrophy, how to exerciseWide or close grip pulldown
  • Wide or close grip pull up
  • Pullover machine
  • High row
  • Face pull
  • Seated/Bent-over row
  • Plate-load row
  • Low row
  • Upright row
  • Rear delt machine/bent-over fly
  • Rotator cuff internal and external rotation
  • Overhead press
  • Incline press
  • Chest press
  • Decline press
  • Dip
  • Lateral raise
  • Chest fly

Simple guidelines:
  • Incline and overhead press, upright row, face pull, lateral raise, rear delt/bent over fly
  • Work each set to volitional muscle fatigue
  • Perform a reasonable number of sets (one to three)
  • Repetitions can vary from 8 to 20

Grow a Pair of Quadriceps

hamstrings, quads, biceps, shoulders, hypertrophy, how to exerciseThe four quadriceps - the vastus medialis, vastus intermedius, vastus lateralis, and rectus femoris - make up the “quads.” The quads primarily extend the knee. To grow large quadriceps, it takes more than simple knee extensions on a knee extensions device. The quads, collectively, possess a lot of muscle mass. They need to be overloaded via heavier exercises that involve knee extension (squats, leg presses, and deadlifts).

Simple guidelines:
  • When squatting, leg pressing, and deadlifting, work each set to volitional muscle fatigue. Yes, it's going to hurt, but that is how you stimulate your quads to grow.
  • Perform a reasonable number of sets (one to three)
  • Repetitions can vary from 10 to 30

Working the legs (and quads) can be discomforting. That is a good thing. Any exercise that is physically and mentally challenging is a productive exercise. Learn to love those exercises that manifest themselves in a lot of huffing and puffing.

And while we’re at it, let’s grow that pair.

Grow a Pair - Mentally

Ultra-high intensity 12-exercise circuit:
  • Minimal (<:20) rest between exercises
  • All exercises to volitional muscular fatigue at 10 to 14 repetitions
  • Use four different upper body push, upper body pull, and multi-joint lower body exercises each
  • Perform upper body push 1, upper body pull 1, multi-joint lower 1, upper push 2, upper pull 2, lower 2, upper push 3, and so forth until all 12 exercises are completed
  • Remember, all-out effort on each set and minimal rest between exercises

Five rounds for time
  • 10 dumbbell burpees with a plank row (right and left) and overhead press
  • 20 dumbbell squats
  • 10 chin ups (bodyweight or assisted)
  • 30 mountain climbers
  • Record the time of your initial workout. Attempt to better it in future workouts.

Fitness Gauntlet:
  • Intervals (running or exercise machine) of :30 all out effort/:15 easy pace x 20 bouts
  • 2:00 rest
  • No more than one minute rest between these events:
  • 50 bodyweight burpees
  • 200 bicycle crunches
  • 150 bodyweight squats
  • 20 dumbbell bent-over rows + 20 dumbbell overhead presses x three rounds
  • Push ups x maximum reps

Attempt to complete the following exercises in under 20 minutes:
  • 300 bodyweight squats
  • 150 push ups (males) 100 (females)
  • 50 dumbbell burpees + one-arm plank row (R & L) + squat + overhead press

The 2-Day ITB Cure for Endurance Athletes

With many endurance athletes suffering from ITB issues, I decided to explain exactly how I got rid of my ITB warning in two days. Two days is a far cry from the length of time I usually see athletes suffer with ITB. Most of them deal with it in one for or another for periods of a year or more.
 

Understand the Root Cause of the Pain

The first step is to understand why the situation happens in the first place. Pain like ITB syndrome or plantar fasciitis often happens with sudden jumps in mileage and training volume. That’s exactly what happened to me.

 RAIL, mobility, triathlon, itb, rolling, activation, integration, locomotion
 

My bike mileage had been quite low for a few months. That was followed by a three-week trip where I rode only twice, and even then those rides were only on a trainer for an hour or so. But with a half-Ironman race scheduled ten days after I arrived home, I rode five days in a row and put in eleven hours over those five days.

"Is it any wonder my body sent me a warning signal that I was overdoing things? That’s exactly what stage one of pain is – a warning sign."

In other words, I rode more in five days than I had in the two months preceding. Is it any wonder my body sent me a warning signal that I was overdoing things? That’s exactly what stage one of pain is – a warning sign. Failure to address it will often see these minor things become major things that can sideline you for a long period of time.

Tiny Glitches Can Cause Massive Problems

The second reason ITB issues can surface is due to bike setup and pedalling style. Even a tiny glitch can cause massive problems when multiplied out by how many revolutions you are doing sub-optimally over an extended period.
 
And when you take the damage caused by setup and pedalling style, and then get off the bike and try to run, you’re multiplying your injury risk by even more. This makes triathletes especially susceptible to ITB issues and is why a good bike setup is vital to longevity in the sport. (I’d also suggest videoing yourself pedalling from front and rear so you can see any possible abnormalities in your stroke and correct them.)

RAIL, mobility, triathlon, itb, rolling, activation, integration, locomotion
Pigeon Stretch
 

Do Some Release Work

Having been warned by my body that if I kept pushing something truly bad would happen, I immediately dropped the riding out of my training plan for a day. If something hurts you, why on Earth keep doing it? At this point it was Sunday, exactly a week away from my half-Ironman, and in my head I was ready to pull out rather than risk more serious problems.

"If something hurts you, why on Earth keep doing it?"

Following the RAIL system, the first thing I had to do was release work. ITB issues are usually caused by something at the hip not working properly. That means that although I did foam roll my ITB, it had almost no effect. After I performed each movement I would get up and walk around to assess what had the best effect in terms of minimizing the catch at my knee. The thing that made the most difference was a ball in my glute.

The next thing that had the biggest impact was the pigeon stretch. Knowing what muscles do is important if you want to stretch them because the best way to stretch a muscle is to do the exact opposite of its functions. The hip (glute medius) performs hip extension, external rotation, and abduction. Pigeon puts the hip in flexion, a bit of internal rotation, and adduction. So it fits perfectly in this situation.

But that’s not the end of it, as I also wanted some active stretching to bridge the gap between release and activate. The option shown in the video below works well as it is essentially a PNF stretch for the hip. Don’t neglect this step.


Activate the Released Muscles

So, we’ve done release via a combination of changing tissue tone with the ball along with passive and active stretching. Now, we need to activate. That was done, as you can see in the video, by lying face down and going through hip extension, external rotation, and abduction. For many, especially long-term cyclists with tight hips, you may need to also stretch the hip flexors and quads to even allow you to extend the leg off the ground.

Integrate Into a Standing Position

Finally we need to integrate. I chose the single-leg deadlift for this because it hits many things at once and gets us into a standing position to check our function. You must return to standing to see if this whole process has been successful. This is important as quite often I see people run through most of this process in one of the lesser postures (lying, quadruped, or kneeling) and then fail to return to standing for a final assessment.

Test With Locomotion

The next step is to test with locomotion. Walking and running are the two most important primitive patterns we have. There’s so much talk about rolling and crawling, but in both cases those patterns are used developmentally to get us to walking. So when you rehabilitate an injury, make sure you can return to pain-free walking and running - and you’re not just left endlessly crawling around on the ground.

RAIL, mobility, triathlon, itb, rolling, activation, integration, locomotion

100% Pain Free Running and Riding

I performed this series three times a day for two days and was 100% pain free afterward. In the days since, I have ridden again and been pain free, and my running has been pain free, too.

The key message is to treat ITB issues early before they become full-blown disasters that force you onto the sidelines for an extended period. That will also mean that in the short term you need to lay off the thing that caused the pain in the first place. Pain is a request for change. Ignore it at your own peril.

Finally, make sure to reintegrate yourself with a movement that can be loaded (as load cements movement patterns). The movement should also make the whole body work as a single unit. Isolation work is great in the early stages of rehab, but your healing process must return you to integrated, functional patterns if it to be successful.

Friday, 14 November 2014

Plantar Fasciitis – Prevention and Treatment

Do you know where your plantar fascia is? Chances are you don’t unless you have injured it and developed plantar fasciitis (inflammation of the plantar fascia). According to the American Academy of Orthopaedic Surgeons approximately two million people seek treatment for plantar fasciitis each year.
 

Your plantar fascia is a thick band of tissue running along the arch of your foot, from your toes to your heel. With prolonged abuse, small tears can develop in the tissue, followed by inflammation and chronic heel pain.
 
According to the Mayo Clinic, plantar fasciitis occurs commonly in runners. High mileage and hard running surfaces can factor into the likelihood of developing the condition.  Also at risk are athletes who spend a lot of time on the balls of their feet, flexing their calves. Without regularly stretching the Achilles and calf muscles, this puts excessive tension on the plantar fascia. Repetitive jumping, obesity, and footwear lacking in support can also be contributing factors to the condition.

Treating Plantar Fasciitis:
  • Stay off your feet – take a break from running or jumping.
  • Ice – reduce swelling and irritation by regularly icing the area.
  • Fish oil – one of the great qualities of this supplement is the reduction of inflammation.
  • Stretching – stretch out your Achilles and calves to relieve tension on your feet
  • Massage – use a foam roller on your calves or a lacrosse ball to massage your feet.
  • Splint – wear a special boot at night to keep your foot flexed and prevent overnight tightening.
 
Also consider purchasing a new pair of shoes with adequate heel support. While barefoot running is all the rage these days, without excellent running form, you could be asking for trouble.

Why Your Mobility Work May Be Harming You

Over the last few years, I’ve watched happily as people have started to come to terms with the importance of mobility work. Of course, given the pendulum that is the fitness industry, now everything that doesn’t work is thought of as a mobility problem.

Erm, no.

Can't Squat or Won't Squat?

Let’s try this as a test. If you know someone who says he can’t squat, tell him to lie on his back and pull his knees to his chest, keeping his tailbone on the ground. It might even be you saying you can’t squat. If so, try this drill yourself.

Being able to get into this position demonstrates that you actually have adequate range to squat. In other words, even though you can’t squat, you do have the requisite mobility.Your inability to squat is not mobility related. Instead, it’s a problem between your ears.

The Cause of Pain Is Poor Movement

Recently I sat in on a workshop led by Dr. Perry Nickleston at the Strength Matters Summit.I was reminded how the body works as a system, not as a sum of its parts, as many still insist upon telling us. The boiled-down version of the workshop goes like this: stiffness at a joint or pain in a muscle is because of a lack of stability elsewhere.

mobility, stability, movement, RAIL, release, activate, locomotion, motor contro

I’m not prone to one-size-fits-all statements, but barring impact injuries, the cause of pain is poor movement. The thing most people miss when using the joint-by-joint approach is that mobile joints need the stiffness from stable joints to function correctly. Imagine holding a bow in your hands. The front hand needs to be stable so that the back hand is free to move. If the front hand waves all over the place, then the back hand will never move to where it is supposed to go and the whole system is inefficient.

"The thing most people miss when using the joint-by-joint approach is that mobile joints need the stiffness from stable joints to function correctly."

Following this logic through, what we see is that an ankle that should be mobile could become tighter and immobile if the core isn’t working well. Distal stiffness is caused by proximal weakness. So the runner who has started suffering from plantar fasciitis or Achilles tendon issues is creating stiffness in that area to deal with the lack of stiffness required elsewhere.

Release and Activate

This is exactly why the idea of just doing some mobility work is flawed. It’s no good just to smash this, floss that, or roll this. Nickleston has an acronym for his system that sums it up brilliantly: RAIL. Release, activate, integrate, locomote.

Most avid fitness buffs are good at the release part. Through using a variety of tools including balls, rollers, and massage itself, it seems everyone has grasped that some kind of release work is vital to tissue quality before any form of corrective or load is added.

But most people fall down in the other sections. It’s no good to get new range from a muscle if you still end up right back where you started - with a problem between the ears. It’s the brain that ultimately controls how much movement you get from a joint. A muscle that is bound up is usually that way because it is working more, not less, than the surrounding muscles.

The muscle that decided to stop working needs to be reprogrammed to do its job properly. Range of motion on its own does nothing to help you. In fact, it may put you at greater risk for injury as now you have more space to control. So don’t just mobilize, re-pattern your movement as well.

mobility, stability, movement, RAIL, release, activate, locomotion, motor contro

Integrate and Locomote

But the road shouldn’t end there, either. Reminding the body of the motor pattern is only part of it. Now you need to integrate this all back into compound movements. This is where you start to see a sequence emerging. Release, activate, and then integrate. You can use primitive pattern work such as crawling and rolling because most of your misfiring muscles will be hit by these.

But that’s still not the end of it all. Because only in standing are we truly in a functional posture, so only in standing can the final work be done. RAIL says that the final step is in locomotion. We spend so much time these days on rolling and mobility work that we forget the final step of the puzzle is always to make sure our movement works in walking and running.

I’m always amazed at how much lip service gets paid to primitive patterns while ignoring the most primitive pattern, and the one that dictated most of our evolution as a species. If your body works right in running, it’ll do everything else properly for you too, as it’s the hardest pattern for the body to get right.

An Example of the RAIL System

Using myself as an example, I came home last week from three weeks away due to work. At the end of this week, I have a half-Ironman distance race (Challenge Shepparton). In an effort to get my bike legs back quickly, I’ve done five hard rides in five days. At the end of the Sunday ride, I noticed my left kneecap was starting to get sore on the top outer edge - a typical symptom of impending IT band troubles.

"The muscle that decided to stop working needs to be reprogrammed to do its job properly. Range of motion on its own does nothing to help you."

The first thing I needed to do was to remove the problem, so there was no riding on Monday, even though the plan said there should be. Second, I spent a lot of time doing release work on my IT band with a roller, as well as the hamstring, quad, calf, and glute on the same side. After each of these sessions, I would go for a walk and see if things had improved. While attacking the ITB made it a little better, the thing that really helped was doing trigger point work on the glute. When I added stretching the glute in pigeon, the situation improved the most.

mobility, stability, movement, RAIL, release, activate, locomotion, motor contro

But you can’t stop there. I’d done release and now needed to activate. Lying prone I did some thigh extension, external rotation, and abduction work to fire up the glutes. Another quick walk around showed that things had improved a little more. The integration aspect came by doing some single-leg deadlifts, which improved the pain again, to the point of almost being completely gone.

The final step in the process was to run again and make sure I was pain free. I did another three rounds of release, activate, and integrate during the day (with a walk test after each time) before heading out the door for a trial run. The result? I was completely pain free.

The Take-Home

Remember, it’s no good to just seek mobility unless you have the follow-up steps in place. Mobility without motor control is just another injury waiting to happen. 

What's Popular Now